深度解析Google Veo 3复现下篇:从多模态数据处理到视频生成模型的PyTorch实现与评估。
原文标题:从零复现Google Veo 3:从数据预处理到视频生成的完整Python代码实现指南(下)
原文作者:数据派THU
冷月清谈:
在数据层面,本文展示了如何将各种模态数据转换为规范的张量格式,并构建统一的MultiModalDataset进行高效管理。模型训练阶段,详细介绍了超参数配置、优化器选择、损失函数计算,以及针对基础分辨率和上采样分辨率去噪的训练循环逻辑。
此外,文章还介绍了模型推理的级联逆向扩散策略,允许用户通过文本或图像提示生成视频。尽管受限于计算资源,本文所复现的模型在有限训练下依然能进行功能验证。为评估模型性能,文章提及了CLIP Score和LPIPS等常用指标,并演示了其计算方法。
通过此复现项目,读者可以深入理解文本到视频生成模型的工作原理、核心组件及其在PyTorch框架下的具体实现,为进一步的探索和研究奠定坚实基础。
怜星夜思:
2、Veo 3模型涉及到视频、音频、图像、文本多种模态的数据,感觉这种多模态融合是未来的趋势。但融合这么多不同类型的数据,技术上是不是特别复杂?未来多模态AI除了视频生成,还能在哪些领域大放异彩呢?是不是所有AI模型都会走向多模态?
3、文章里用CLIP模型替代了Google原本的UL2模型作为条件编码器。这种“平替”操作在AI模型复现或者开发中常见吗?这样做会有什么好处和坏处?会严重影响最终的模型效果吗?你们平时在工作中会选择用这种平替方案吗?
原文内容

来源:DeepHub IMBA本文分为上下两篇共30000字,建议阅读15+分钟
本项目为理解文本到视频生成模型的工作原理以及如何使用 PyTorch 从零开始构建此类模型提供了一个基础框架。
Veo 3 模型架构
第二阶段是 Veo 3 模型架构的编码实现。此阶段是整个项目的核心与难点所在,涉及 Veo 3 模型具体架构的设计与代码实现。
Veo 3 支持通过以下两种类型的输入生成高质量视频:
-
文本提示 (Text prompts):对期望视频内容的自然语言描述,例如“向日葵绽放的延时摄影 (A timelapse of a sunflower blooming)。”
-
图像提示 + 文本提示 (Image prompts + Text prompts):图像与文本描述的组合,例如,提供一张向日葵图片,并配合文本“向日葵绽放的延时摄影 (A timelapse of a sunflower blooming)”。
其核心流程可图示如下:
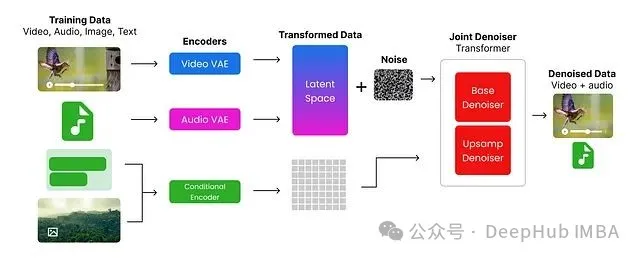
流程概述:
-
视频与音频分别通过视频编码器 (Video Encoder)与音频编码器 (Audio Encoder)进行编码。
-
图像与文本则利用 Google 提供的 UL2 编码器进行编码。
-
编码后的视频与音频(通常会加入一定的噪声),连同嵌入式图像与文本信息,共同输入到一个基于 Transformer 架构的联合去噪器 (Joint Denoiser)。
-
该联合去噪器处理这些多模态输入,并生成视频与音频的联合表示。
接下来将逐步实现这些组件。首先,导入此阶段所需的 Python 库。
import imageio  # For reading/writing images  # 用于读写图像
from PIL import Image  # For image manipulation  # 用于图像处理
import torch  # Core PyTorch library  # PyTorch 核心库
import torch.nn as nn  # For neural network modules  # PyTorch 神经网络模块
import torch.nn.functional as F  # Functional API (e.g., activation functions)  # PyTorch 函数式 API (如激活函数)
import torch.optim as optim  # Optimizers (e.g., Adam, SGD)  # PyTorch 优化器 (如 Adam, SGD)
from torch.optim.lr_scheduler import CosineAnnealingLR  # Learning rate scheduler  # 学习率调度器
from torch.utils.data import Dataset, DataLoader  # For creating datasets and loading data  # 用于创建数据集和数据加载器
import torchaudio  # For audio processing  # 用于音频处理
from torchvision import transforms  # For common image transformations  # 用于常见图像变换
from diffusers import DDPMScheduler  # For diffusion models scheduling  # Diffusers 库中的 DDPMScheduler
from transformers import CLIPProcessor, CLIPModel  # For CLIP model and processor  # Transformers 库中的 CLIP 模型和处理器
from einops import rearrange  # For tensor reshaping and repetition  # einops 库,用于张量重排和重复
import numpy as np  # For numerical operations  # NumPy 库,用于数值运算
import skimage.transform # For image transformations (e.g., resizing, cropping)  # scikit-image 库,用于图像变换 (如缩放、裁剪)
# Set computation device to GPU if available, otherwise CPU
# 设置计算设备,优先使用 GPU (如果可用),否则使用 CPU
DEVICE = torch.device("cuda" if torch.cuda.is_available() else "cpu")
数据重组
在数据预处理阶段,最终的数据集仅包含视频文件。然而,Veo 3 模型支持图像与文本结合的输入方式,并且音频数据需要单独处理。因此,首要任务是对数据集进行重组,为每种数据类型建立清晰的结构。
目标数据结构如下: 📁 dataset/ ├── 📁 t2v_pairs/ # dir containing text to videos pairs training data # 包含文本到视频对训练数据的目录 │ ├── 📄 video_1.mp4 # video file # 视频文件 │ ├── 📄 video_1.wav # audio file (extracted from video_1.mp4) # 音频文件 (从 video_1.mp4 提取) │ ├── 📄 video_1.txt # text prompt or annotation for video_1.mp4 # video_1.mp4 的文本提示或标注 │ └── ... └── 📁 i2v_pairs/ # dir containing image to videos pairs training data # 包含图像到视频对训练数据的目录 ├── 📄 image_1.jpg # input image # 输入图像 ├── 📄 video_1.mp4 # generated video file # 生成的视频文件 ├── 📄 video_1.wav # audio file (extracted from video_1.mp4) # 音频文件 (从 video_1.mp4 提取) └── ...
此步骤主要涉及常规的 Python 文件操作与数据组织,其具体代码实现已整合至 transform_data.py 文件中,可用于将前述处理得到的修剪后视频数据转换为上述 dataset/ 目录结构。此处不再赘述其实现细节。
dataset/ 目录准备就绪后,需进一步依据音频、图像和视频文件的路径,创建结构化的数据集变量。这将便于在模型训练和推理阶段高效地访问数据。
首先,定义包含成对数据集的目录路径: # Paths # 路径定义 i2v_dir = 'dataset/i2v_pairs' t2v_dir = 'dataset/t2v_pairs'
# Collect files
# 收集文件列表
i2v_files = os.listdir(i2v_dir)
t2v_files = os.listdir(t2v_dir)
构建文本到视频 (Text-to-Video, T2V) 的数据对信息。
# Build T2V_INFO
# 构建 T2V_INFO 列表
t2v_info = []
t2v_videos = [f for f in t2v_files if f.endswith('.mp4')]
for idx, video_file in enumerate(t2v_videos, start=1):
    base_name = os.path.splitext(video_file)[0]
    audio_file = f"{base_name}.wav"
    # Find matching annotation
    # 查找匹配的标注信息
    annotation = next((a for a in video_annotations if a['video_path'].split('\\')[-1] == video_file), None)
    caption = annotation['summary'] if annotation else ''
    t2v_info.append({
        'id': f"t2v_{idx:03d}",
        'video_path': video_file,
        'audio_path': audio_file,
        'initial_caption': caption
    })
类似地,构建图像加文本到视频 (Image+Text-to-Video, I2V) 的数据对信息。
# Build I2V_INFO
# 构建 I2V_INFO 列表
i2v_info = []
i2v_images = [f for f in i2v_files if f.endswith('.jpg')]
for idx, image_file in enumerate(i2v_images, start=1):
    base_name = os.path.splitext(image_file)[0]
    video_file = f"{base_name}.mp4"
    audio_file = f"{base_name}.wav"
    # Find matching annotation
    # 查找匹配的标注信息
    annotation = next((a for a in video_annotations if a['video_path'].split('\\')[-1] == video_file), None)
    prompt = annotation['summary'] if annotation else ''
    i2v_info.append({
        'id': f"i2v_{idx:03d}",
        'image_path': image_file,
        'target_video_path': video_file,
        'target_audio_path': audio_file,
        'prompt': prompt
    })
检查生成的数据对数量。
len(i2v_info), len(t2v_info)  # Check the lengths of the info lists  # 检查信息列表的长度
#### OUTPUT ####
(5, 17)
为进行模型训练,需将训练数据(包括视频、音频、图像)转换为张量 (tensors)。张量是可供模型处理并在训练过程中优化的多维数组。本实现将使用 torch 库完成数据到张量的转换。
定义两个核心的预处理函数:一个用于视频数据,另一个用于音频数据。同时,声明一些后续流程中将使用的常量与参数。
# Base video frames (meaning the number of frames to extract from each video)
# 基础视频帧数 (即从每个视频中提取的帧数)
BASE_VIDEO_FRAMES = 16
# Function to preprocess video files into tensors
# 将视频文件预处理为张量的函数
def preprocess_video(path, target_height, target_width):
    # Read video frames using imageio
    # 使用 imageio 读取视频帧
    reader = imageio.get_reader(path, 'ffmpeg')
    frames = []
    for i, f in enumerate(reader):
        if i >= BASE_VIDEO_FRAMES:
            break
        # Resize each frame to (target_height, target_width) and convert to tensor (C, H, W)
        # 将每帧调整大小至 (target_height, target_width) 并转换为张量 (通道, 高, 宽)
        resized = skimage.transform.resize(f, (target_height, target_width), anti_aliasing=True)
        tensor = torch.from_numpy(resized).permute(2, 0, 1).float()
        frames.append(tensor)
    # Pad with black frames if not enough frames are present
    # 如果帧数不足,则用黑色帧进行填充
    if len(frames) < BASE_VIDEO_FRAMES and frames:
        pad_frame = torch.zeros_like(frames[0])
        frames.extend([pad_frame] * (BASE_VIDEO_FRAMES - len(frames)))
    # Stack frames into a tensor of shape (C, T, H, W)
    # 将帧堆叠为形状为 (通道, 帧数, 高, 宽) 的张量
    return torch.stack(frames, dim=1) if frames else None
视频预处理函数定义完毕,其中包含一个关键参数 BASE_VIDEO_FRAMES。接下来定义音频文件的预处理函数,并设定音频相关的特定参数。
# Audio parameters
# 音频参数
AUDIO_SAMPLE_RATE = 16000 # Standard sample rate for audio processing (meaning the number of samples per second)  # 音频处理的标准采样率 (即每秒采样数)
AUDIO_DURATION_SEC = 2 # Duration of audio clips in seconds (meaning how long each audio clip should be)  # 音频片段时长 (秒) (即每个音频片段的长度)
AUDIO_SAMPLES = AUDIO_SAMPLE_RATE * AUDIO_DURATION_SEC # Total number of audio samples (meaning the total number of audio samples in the clip)  # 音频样本总数 (即片段中的总音频采样点数)
# This function preprocesses audio files to ensure they are in the correct format and length
# 此函数对音频文件进行预处理,以确保其格式和长度符合要求
def preprocess_audio(path):
    w, sr = torchaudio.load(path)
    # Keep only the first channel if multi-channel
    # 如果是多声道音频,则仅保留第一个声道
    if w.shape[0] > 1:
        w = w[:1, :]
    # Resample if needed
    # 如果采样率不匹配,则进行重采样
    if sr != AUDIO_SAMPLE_RATE:
        w = torchaudio.transforms.Resample(sr, AUDIO_SAMPLE_RATE)(w)
    # Pad or trim to fixed length
    # 填充或裁剪至固定长度
    if w.shape[1] < AUDIO_SAMPLES:
        w = F.pad(w, (0, AUDIO_SAMPLES - w.shape[1]))
    else:
        w = w[:, :AUDIO_SAMPLES]
    # Normalize
    # 归一化处理
    max_val = torch.max(torch.abs(w))
    if max_val > 0:
        w = w / max_val
    return w
训练过程关注两种视频张量:基础视频张量 (base video tensor) 与上采样视频张量 (upsampled video tensor)。基础视频张量由原始视频帧构成,而上采样视频张量则通过重复帧以匹配目标帧数来创建。
为统一处理图像、视频和音频数据,需在现有预处理函数的基础上构建两个新的数据加载函数。
# Define constants for video dimensions
# 定义视频尺寸常量
UPSAMPLED_VIDEO_HEIGHT = 64 # Height of the upsampled video frames (meaning the height of the video frames after upsampling)  # 上采样视频帧的高度 (即上采样后视频帧的高度)
UPSAMPLED_VIDEO_WIDTH = 64 # Width of the upsampled video frames (meaning the width of the video frames after upsampling)  # 上采样视频帧的宽度 (即上采样后视频帧的宽度)
BASE_VIDEO_HEIGHT = 32 # Height of the base video frames (meaning the height of the original video frames before upsampling)  # 基础视频帧的高度 (即上采样前原始视频帧的高度)
BASE_VIDEO_WIDTH = 32 # Width of the base video frames (meaning the width of the original video frames before upsampling)  # 基础视频帧的宽度 (即上采样前原始视频帧的宽度)
T2V_DATA_DIR = 'dataset/t2v_pairs' # Directory for T2V pairs (meaning the directory where the text-to-video pairs are stored)  # T2V 数据对目录 (即存储文本到视频数据对的目录)
I2V_DATA_DIR = 'dataset/i2v_pairs' # Directory for I2V pairs (meaning the directory where the image-to-video pairs are stored)  # I2V 数据对目录 (即存储图像到视频数据对的目录)
参数定义完成后,编写 T2V 和 I2V 数据集的加载逻辑。
def load_i2v_item(info):
    # Load a base and upsampled version of the input image
    # 加载输入图像的基础分辨率版本和上采样版本
    img_pil = Image.open(
        os.path.join(I2V_DATA_DIR, info['image_path'])
    ).convert('RGB')
    img_base = transforms.ToTensor()(
        img_pil.resize((BASE_VIDEO_WIDTH, BASE_VIDEO_HEIGHT))
    )
    img_upsampled = transforms.ToTensor()(
        img_pil.resize((UPSAMPLED_VIDEO_WIDTH, UPSAMPLED_VIDEO_HEIGHT))
    )
    # Preprocess target video at base and upsampled resolutions
    # 在基础分辨率和上采样分辨率下预处理目标视频
    vid_base = preprocess_video(
        os.path.join(I2V_DATA_DIR, info['target_video_path']),
        BASE_VIDEO_HEIGHT, BASE_VIDEO_WIDTH
    )
    vid_upsampled = preprocess_video(
        os.path.join(I2V_DATA_DIR, info['target_video_path']),
        UPSAMPLED_VIDEO_HEIGHT, UPSAMPLED_VIDEO_WIDTH
    )
    # Preprocess target audio
    # 预处理目标音频
    aud = preprocess_audio(
        os.path.join(I2V_DATA_DIR, info['target_audio_path'])
    )
    # Return a dictionary containing all modalities and metadata
    # 返回一个包含所有模态数据和元数据的字典
    return {
        'modality': 'i2v',
        'input_image_base': img_base,
        'input_image_upsampled': img_upsampled,
        'target_video_base': vid_base,
        'target_video_upsampled': vid_upsampled,
        'target_audio': aud,
        'caption': info['prompt'],
        'id': info['id']
    }
以及 T2V 数据项的加载逻辑:
def load_t2v_item(info):
    base_vid = preprocess_video(
        os.path.join(T2V_DATA_DIR, info['video_path']),
        BASE_VIDEO_HEIGHT, BASE_VIDEO_WIDTH
    )
    upsampled_vid = preprocess_video(
        os.path.join(T2V_DATA_DIR, info['video_path']),
        UPSAMPLED_VIDEO_HEIGHT, UPSAMPLED_VIDEO_WIDTH
    )
    audio = preprocess_audio(
        os.path.join(T2V_DATA_DIR, info['audio_path'])
    )
    if base_vid is not None and upsampled_vid is not None and audio is not None:
        return {
            'modality': 't2v',
            'video_base': base_vid,
            'video_upsampled': upsampled_vid,
            'audio': audio,
            'caption': info['initial_caption'],
            'id': info['id']
        }
    return None
至此,数据重组的最后一步——将数据转换为适合训练的张量格式——已准备就绪。
# Load Text-to-Video (T2V) data:
# 加载文本到视频 (T2V) 数据:
# - For each entry in t2v_info, call load_t2v_item to preprocess video, audio, and caption.
# - 对 t2v_info 中的每个条目,调用 load_t2v_item 函数预处理视频、音频和字幕。
# - Only keep non-None results.
# - 仅保留非 None 的结果。
t2v_data = [
    d for d in [
        load_t2v_item(i) for i in tqdm(t2v_info, desc="Loading T2V data")
    ] if d
]
# Load Image-to-Video (I2V) data:
# 加载图像到视频 (I2V) 数据:
# - For each entry in i2v_info, call load_i2v_item to preprocess image, video, audio, and prompt.
# - 对 i2v_info 中的每个条目,调用 load_i2v_item 函数预处理图像、视频、音频和提示。
# - Only keep non-None results.
# - 仅保留非 None 的结果。
i2v_data = [
    d for d in [
        load_i2v_item(i) for i in tqdm(i2v_info, desc="Loading I2V data")
    ] if d
]
将更新后的张量数据合并为一个统一的数据变量。
raw_data = t2v_data + i2v_data # Combine both datasets # 合并两个数据集
原始数据已成功转换为适合训练的格式。在进入视频或音频编码器实现之前,需创建一个 MultiModalDataset 类,用于统一管理数据加载与批处理。该类将以结构化方式封装所有转换后的数据,便于访问不同模态(视频、音频、图像、文本)及其对应的字幕信息。
创建多模态数据集 (MultiModalDataset)
采用面向对象编程(OOP)是组织训练数据的恰当方式。此处将创建一个 MultiModalDataset 类,负责 T2V 和 I2V 数据集的数据加载与处理。
BATCH_SIZE = 1  # Batch size for DataLoader (how many samples to process in one batch)  # DataLoader 的批处理大小 (即单批次处理的样本数量)
class MultiModalDataset(Dataset):
    def __init__(self, data_list):
        # Store the list of data samples (each sample is a dict for t2v or i2v)
        # 存储数据样本列表 (每个样本是一个用于 t2v 或 i2v 的字典)
        self.data = data_list
    def __len__(self):
        # Return the number of samples in the dataset
        # 返回数据集中的样本总数
        return len(self.data)
    def __getitem__(self, idx):
        # Get the sample at the given index
        # 获取指定索引处的样本
        item = self.data[idx]
        # Use the caption (should be set in your data)
        # 使用样本中的字幕信息
        caption_string = item['caption']
        if item['modality'] == 't2v':
            # For text-to-video: return video, audio, and a dummy image tensor
            # 对于文本到视频 (t2v) 模态:返回视频、音频和一个占位图像张量
            return {
                'modality': 't2v',
                'video_base': item['video_base'],
                'video_upsampled': item['video_upsampled'],
                'audio': item['audio'],
                'raw_caption': caption_string,
                # Dummy image tensor (all zeros) for t2v, shape matches a single video frame
                # 为 t2v 提供的占位图像张量 (全零),其形状与单帧视频匹配
                'input_image_base': torch.zeros_like(item['video_base'][:, 0]),
            }
        else:  # For image-to-video  # 对于图像到视频 (i2v) 模态
            return {
                'modality': 'i2v',
                'video_base': item['target_video_base'],
                'video_upsampled': item['target_video_upsampled'],
                'audio': item['target_audio'],
                'raw_caption': caption_string,
                # Use the actual input image tensor for i2v
                # 为 i2v 使用实际的输入图像张量
                'input_image_base': item['input_image_base'],
            }
通过在原始数据之上实例化 MultiModalDataset 类,即可构建数据集对象。该类继承自 torch.utils.data.Dataset,后者是 PyTorch 提供的标准接口,用于以批处理方式加载和处理数据。
# Create the dataset and dataloader for training
# 为训练创建数据集和数据加载器
# - train_dataset: wraps the raw_data list using the MultiModalDataset class
# - train_dataset: 使用 MultiModalDataset 类封装 raw_data 列表
# - train_dataloader: DataLoader for batching and shuffling during training
# - train_dataloader: 用于训练时进行批处理和数据打乱的 DataLoader
train_dataset = MultiModalDataset(raw_data)
train_dataloader = DataLoader(train_dataset, batch_size=BATCH_SIZE, shuffle=True)
至此,数据已准备就绪。接下来,我们将着手实现 Veo 3 模型的具体架构,包括视频编码器、音频编码器、条件编码器、联合去噪器等多个核心组件。
视频变分自编码器 (Video VAE)
原始数据经过预处理并重组为 PyTorch Dataset 后,为训练视频生成模型奠定了基础。现在,我们开始构建模型的第一个组件:视频变分自编码器 (Video Variational Autoencoder, Video VAE)。
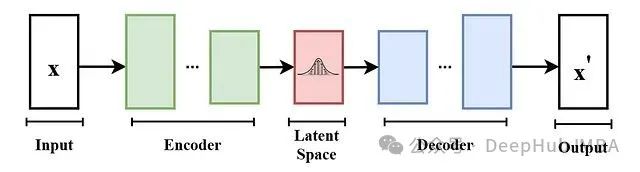
变分自编码器(VAE)是一种广泛应用于无监督学习,特别是生成模型领域的神经网络架构。它主要由两部分构成:
-
编码器 (Encoder):将输入数据(如图像或视频)映射到一个低维的潜在空间 (Latent Space) 表示。
-
解码器 (Decoder):将潜在空间表示映射回原始数据空间,从而实现对输入数据的重建。
其基本架构如下图所示:
其工作流程如下:
-
编码器接收输入张量,并将其编码为一个潜在向量 (Latent Vector)。该向量捕获了输入数据的关键特征(例如,图像或视频帧的形状、颜色、纹理等)。
-
编码器通常由一系列卷积层组成,这些卷积层在提取特征的同时,逐步对输入张量进行下采样。
-
解码器接收此潜在向量,并重建原始输入数据。它通常采用转置卷积层 (Transposed Convolutional Layers) 将潜在表示上采样回原始维度。
以下是 VideoVAE 的代码实现
VIDEO_LATENT_CHANNELS = 4 # Number of channels in the latent space for video (meaning the number of feature maps in the latent representation)  # 视频潜在空间中的通道数 (即潜在表示中特征图的数量)
class VideoVAE(nn.Module):
    def __init__(self):
        super().__init__()
        # Encoder: Input shape (B, 3, F, H, W) -> Latent (B, C_lat, F/2, H/8, W/8)
        # 编码器: 输入形状 (批量大小, 3, 帧数, 高, 宽) -> 潜在表示 (批量大小, 潜在通道数, 帧数/2, 高/8, 宽/8)
        self.e = nn.Sequential(
            # First 3D conv: downsample F, H, W by 2, output channels 32
            # 第一个3D卷积层: 帧数、高、宽均下采样2倍,输出通道数为32
            nn.Conv3d(3, 32, kernel_size=3, stride=(2, 2, 2), padding=1), nn.SiLU(),
            # Second 3D conv: downsample H, W by 2, output channels 64
            # 第二个3D卷积层: 高、宽下采样2倍,输出通道数为64
            nn.Conv3d(32, 64, kernel_size=3, stride=(1, 2, 2), padding=1), nn.SiLU(),
            # Third 3D conv: downsample H, W by 2, output channels 128
            # 第三个3D卷积层: 高、宽下采样2倍,输出通道数为128
            nn.Conv3d(64, 128, kernel_size=3, stride=(1, 2, 2), padding=1), nn.SiLU(),
            # Final 3D conv: output latent channels, no downsampling
            # 最后一个3D卷积层: 输出潜在通道,无下采样
            nn.Conv3d(128, VIDEO_LATENT_CHANNELS, kernel_size=3, stride=1, padding=1)
        )
        # Decoder: Latent -> Output (reverse of encoder)
        # 解码器: 潜在表示 -> 输出 (编码器的逆过程)
        self.d = nn.Sequential(
            # First transpose conv: keep shape, output channels 128
            # 第一个转置卷积层: 保持形状,输出通道数为128
            nn.ConvTranspose3d(VIDEO_LATENT_CHANNELS, 128, kernel_size=3, stride=1, padding=1), nn.SiLU(),
            # Second transpose conv: upsample H, W by 2, output channels 64
            # 第二个转置卷积层: 高、宽上采样2倍,输出通道数为64
            nn.ConvTranspose3d(128, 64, kernel_size=3, stride=(1, 2, 2), padding=1, output_padding=(0, 1, 1)), nn.SiLU(),
            # Third transpose conv: upsample H, W by 2, output channels 32
            # 第三个转置卷积层: 高、宽上采样2倍,输出通道数为32
            nn.ConvTranspose3d(64, 32, kernel_size=3, stride=(1, 2, 2), padding=1, output_padding=(0, 1, 1)), nn.SiLU(),
            # Final transpose conv: upsample F, H, W by 2, output channels 3 (RGB)
            # 最后一个转置卷积层: 帧数、高、宽均上采样2倍,输出通道数为3 (RGB)
            nn.ConvTranspose3d(32, 3, kernel_size=3, stride=(2, 2, 2), padding=1, output_padding=1), nn.Sigmoid()
        )
    def encode(self, x):
        # Pass input through encoder
        # 将输入数据传递给编码器
        return self.e(x)
    def decode(self, x):
        # Pass latent through decoder
        # 将潜在表示传递给解码器
        return self.d(x)
所设计的 VideoVAE 包含一个编码器(encoder)和一个解码器(decoder)。编码器负责将输入视频压缩为低维的潜在表示(latent representation),而解码器则从该潜在表示重建原始视频。编码器采用 3D 卷积处理时间维度(帧)以及空间维度(高和宽),解码器则利用转置卷积将潜在表示上采样回原始视频的形状。
Veo 3 同样具备音频生成能力,因此,我们接下来为音频数据构建一个类似的 VAE。
音频变分自编码器 (Audio VAE)
音频数据的处理方式与 VideoVAE 类似,但由于音频是一维时序数据,因此采用 1D 卷积。编码器接收音频输入并将其压缩为潜在表示,解码器则从该潜在表示重建音频。
定义 AudioVAE 类,其功能与 VideoVAE 类似,但专用于处理音频数据。
AUDIO_LATENT_CHANNELS = 16  # Number of channels in the latent space for audio (meaning the number of feature maps in the latent representation)  # 音频潜在空间中的通道数 (即潜在表示中特征图的数量)
class AudioVAE(nn.Module):
    def __init__(self):
        super().__init__()
        # Encoder: Input shape (B, 1, 32000) -> Latent (B, AUDIO_LATENT_CHANNELS, 1000)
        # 编码器: 输入形状 (批量大小, 1, 32000) -> 潜在表示 (批量大小, 音频潜在通道数, 1000)
        self.e = nn.Sequential(
            # First 1D conv: downsample audio, output 16 channels
            # 第一个1D卷积层: 下采样音频,输出16个通道
            nn.Conv1d(1, 16, kernel_size=32, stride=8, padding=12), nn.SiLU(),
            # Second 1D conv: further downsample, output latent channels
            # 第二个1D卷积层: 进一步下采样,输出潜在通道
            nn.Conv1d(16, AUDIO_LATENT_CHANNELS, kernel_size=32, stride=4, padding=14)
        )
        # Decoder: Latent -> Output (reverse of encoder)
        # 解码器: 潜在表示 -> 输出 (编码器的逆过程)
        self.d = nn.Sequential(
            # First transpose conv: upsample, output 16 channels
            # 第一个转置卷积层: 上采样,输出16个通道
            nn.ConvTranspose1d(AUDIO_LATENT_CHANNELS, 16, kernel_size=32, stride=4, padding=14), nn.SiLU(),
            # Second transpose conv: upsample to original length, output 1 channel
            # 第二个转置卷积层: 上采样至原始长度,输出1个通道
            nn.ConvTranspose1d(16, 1, kernel_size=32, stride=8, padding=12),
            nn.Tanh()  # Output in range [-1, 1]  # 输出范围在 [-1, 1] 之间
        )
    def encode(self, x):
        # Pass input through encoder
        # 将输入数据传递给编码器
        return self.e(x)
    def decode(self, x):
        # Pass latent through decoder
        # 将潜在表示传递给解码器
        return self.d(x)
AudioVAE 类专为处理音频数据而设计,特别是针对采样率为 16kHz、时长为 2 秒的音频文件。该模型将音频编码为潜在表示,并能将其解码回原始音频格式。
至此,Veo 3 的 VideoVAE 和 AudioVAE 两个核心组件已实现。接下来,需要实现负责处理文本和图像输入的编码器。
条件编码器 Conditional Encoder (采用 CLIP替代 UL2)
Google Veo 3 采用 UL2 模型进行条件编码。考虑到 UL2 模型规模较大,不易在本地设备运行,本实现将采用 OpenAI 的 CLIP 模型作为替代。CLIP 模型相对轻量,且同样具备强大的文本与图像编码能力。
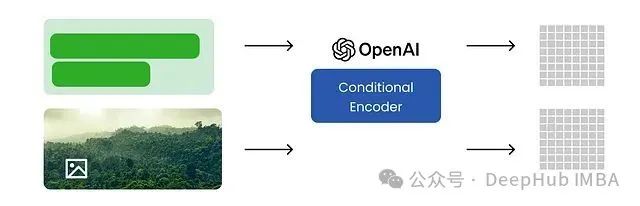
训练过程中的文本与图像数据将输入条件编码器,该编码器负责将文本和图像编码为统一的联合表示 (Joint Representation)。此联合表示随后将作为条件,引导视频生成模型的行为。
创建一个条件编码器类,能够接收字幕和图像作为输入,并输出编码后的文本与图像特征。
TEXT_MAX_LENGTH = 77 # Maximum length for text inputs (meaning the maximum number of tokens in the text)  # 文本输入的最大长度 (即文本中的最大词元数量)
class ConditioningEncoder(nn.Module):
    def __init__(self, model_name="openai/clip-vit-large-patch14"):
        super().__init__()
        # Load the pretrained CLIP model and processor
        # 加载预训练的 CLIP 模型和处理器
        self.model = CLIPModel.from_pretrained(model_name)
        self.processor = CLIPProcessor.from_pretrained(model_name)
    def get_text_embeds(self, text):
        # Preprocess the input text and move tensors to the configured device
        # 预处理输入文本并将张量移至配置的设备
        inputs = self.processor(
            text=text,
            return_tensors="pt",
            padding=True,
            truncation=True,
            max_length=TEXT_MAX_LENGTH
        ).to(DEVICE)
        # Get text embeddings from the CLIP model
        # 从 CLIP 模型获取文本嵌入
        return self.model.get_text_features(**inputs)
    def get_image_embeds(self, image):
        # If input is a torch tensor, avoid rescaling (already preprocessed)
        # 如果输入是 PyTorch 张量,则避免重新缩放 (假设已预处理)
        if isinstance(image, torch.Tensor):
            inputs = self.processor(
                images=image,
                return_tensors="pt",
                do_rescale=False
            ).to(DEVICE)
        else:
            # Otherwise, preprocess the image normally
            # 否则,正常预处理图像
            inputs = self.processor(
                images=image,
                return_tensors="pt"
            ).to(DEVICE)
        # Get image embeddings from the CLIP model
        # 从 CLIP 模型获取图像嵌入
        return self.model.get_image_features(**inputs)
处理不同类型数据(视频、音频、文本、图像)的编码器类均已定义完毕。根据 Google 的技术报告,Veo 3 架构中采用了一个基于 Transformer 的去噪组件。接下来,我们将构建一个基于 Transformer 的模型,负责对视频、音频和文本嵌入进行去噪处理。该模型将接收来自 VideoVAE、AudioVAE 和 ConditioningEncoder 的潜在表示,并通过一系列 Transformer 层进行处理。
Transformer 模块 (Transformer Block)
Transformer 是一种基于自注意力机制的神经网络架构,最初为处理序列数据(如文本)而设计,现已广泛应用于图像、视频等多种模态。它通过自注意力机制权衡输入序列中不同部分的重要性,从而有效捕捉数据内部的长程依赖关系。
Transformer 的具体实现可以非常复杂,也可以相对简化,具体取决于应用场景和可用训练数据量。考虑到本项目为学习性质,我们将为多模态模型实现一个简化版的 Transformer 架构。
# It is a function that applies adaptive layer normalization modulation
# 该函数应用自适应层归一化调制
def modulate(x, shift, scale):
    # Applies adaptive layer normalization modulation: scales and shifts normalized input
    # 应用自适应层归一化调制:对归一化后的输入进行缩放和移位
    return x * (1 + scale.unsqueeze(1)) + shift.unsqueeze(1)
class TransformerBlock(nn.Module):
    def __init__(self, dim, heads):
        super().__init__()
        # Layer normalization before attention
        # 注意力之前的层归一化
        self.norm1 = nn.LayerNorm(dim)
        # Multi-head self-attention
        # 多头自注意力机制
        self.attn = nn.MultiheadAttention(dim, heads, batch_first=True)
        # Layer normalization before MLP
        # MLP之前的层归一化
        self.norm2 = nn.LayerNorm(dim)
        # Feed-forward MLP
        # 前馈多层感知机
        self.mlp = nn.Sequential(
            nn.Linear(dim, dim * 4),
            nn.GELU(),
            nn.Linear(dim * 4, dim)
        )
        # Adaptive LayerNorm modulation for attention and MLP (6 outputs)
        # 用于注意力和MLP的自适应层归一化调制(6个输出)
        self.adaLN_modulation = nn.Sequential(
            nn.SiLU(),
            nn.Linear(dim, 6 * dim, bias=True)
        )
    def forward(self, x, c):
        # Compute modulation parameters from conditioning vector c
        # 从条件向量 c 计算调制参数
        shift_msa, scale_msa, gate_msa, shift_mlp, scale_mlp, gate_mlp = self.adaLN_modulation(c).chunk(6, dim=1)
        # Apply modulated attention with gating
        # 应用带门控的调制注意力
        x = x + gate_msa.unsqueeze(1) * self.attn(
            modulate(self.norm1(x), shift_msa, scale_msa), x, x
        )[0]
        # Apply modulated MLP with gating
        # 应用带门控的调制MLP
        x = x + gate_mlp.unsqueeze(1) * self.mlp(
            modulate(self.norm2(x), shift_mlp, scale_mlp)
        )
        return x
class FinalLayer(nn.Module):
    def __init__(self, hidden_size, patch_size, out_channels):
        super().__init__()
        # Final layer normalization (no affine params)
        # 最终层归一化(无仿射参数)
        self.norm_final = nn.LayerNorm(hidden_size, elementwise_affine=False, eps=1e-6)
        # Linear projection to patch size
        # 线性投影到补丁大小
        self.linear = nn.Linear(hidden_size, patch_size, bias=True)
        # Adaptive LayerNorm modulation for final layer (2 outputs)
        # 用于最终层的自适应层归一化调制(2个输出)
        self.adaLN_modulation = nn.Sequential(
            nn.SiLU(),
            nn.Linear(hidden_size, 2 * hidden_size, bias=True)
        )
    def forward(self, x, c):
        # Compute shift and scale from conditioning vector c
        # 从条件向量 c 计算移位和缩放参数
        shift, scale = self.adaLN_modulation(c).chunk(2, dim=1)
        # Apply modulation and final linear projection
        # 应用调制和最终的线性投影
        x = modulate(self.norm_final(x), shift, scale)
        x = self.linear(x)
        return x
本实现的 Transformer 模型包含以下核心组件:
-
ConditioningEncoder (条件编码器):已在前述章节定义,负责将文本和图像输入编码为嵌入向量。
-
TransformerBlock (Transformer 模块):实现多头自注意力机制和带有自适应层归一化(Adaptive LayerNorm)调制的前馈网络。
-
FinalLayer (最终层):对 Transformer 模块的输出进行归一化处理,并通过线性投影将其映射到期望的输出维度(例如,补丁大小),同样应用调制。
这是一个相对简化的 Transformer 实现,但已涵盖了处理文本和图像输入所需的基本要素。
时间步嵌入生成 (Timestep Embedding Generation)
在扩散模型中,时间步嵌入 (Timestep Embedding) 至关重要,它负责对扩散过程中的各个时间步进行编码,使模型能够感知和利用去噪过程的进展信息。
该模块通常基于时间步索引生成正弦位置编码(Sinusoidal Positional Encoding),然后通过一个小型多层感知机(MLP)将其投影到一个更高维度的空间,以便有效地作为模型的条件输入。
class TimestepEmbedding(nn.Module):
    def __init__(self, dim):
        super().__init__()
        self.dim = dim
        # MLP to project the embedding to a higher dimension
        # MLP 将嵌入投影到更高维度
        self.mlp = nn.Sequential(
            nn.Linear(dim, dim * 4),
            nn.SiLU(),
            nn.Linear(dim * 4, dim * 4)
        )
    def forward(self, t):
        # Compute sinusoidal timestep embedding (like in transformers/diffusion models)
        # 计算正弦时间步嵌入 (类似于 Transformer/扩散模型中的做法)
        half_dim = self.dim // 2
        # Exponential decay for frequencies
        # 频率的指数衰减
        emb = torch.exp(
            torch.arange(half_dim, device=t.device) * -(np.log(10000.0) / (half_dim - 1))
        )
        # Outer product: shape (batch, half_dim)
        # 外积: 形状 (批量大小, half_dim)
        emb = t.float()[:, None] * emb[None, :]
        # Concatenate sin and cos embeddings
        #拼接 sin 和 cos 嵌入
        emb = torch.cat([torch.sin(emb), torch.cos(emb)], dim=1)
        # Pass through MLP for further projection
        #通过 MLP 进行进一步投影
        return self.mlp(emb)
TimestepEmbedding 类实现了计算时间步正弦嵌入的功能。其 forward 方法负责生成嵌入向量,并通过一个 MLP 将其投影到更高维度。
联合去噪模型 (Joint Denoising Model, JDM)
接下来,将实现 JointDenoisingTransformer 类,它将集成前述定义的所有组件。
JointDenoisingTransformer 的核心功能是接收带噪声的视频和音频输入、当前的时间步信息以及上下文(文本或图像嵌入),并输出去噪后的视频和音频。
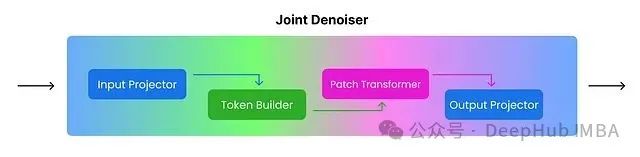
JointDenoisingTransformer 的实现将分解为以下几个关键组件:
-
InputProjector:负责将带噪声的输入(视频和音频)投影为补丁 (Patches) 并进行嵌入,即将其转换为适合后续处理的格式。
-
TokenBuilder:基于投影得到的补丁构建词元 (Tokens) 序列,其中包含代表视频和音频补丁的词元,以及特殊的模态指示词元。
-
PatchTransformer:将 Transformer 架构应用于这些词元序列,通过自注意力机制捕捉序列内部的关系与依赖。
-
OutputProjector:将经过 Transformer 处理的词元序列投影回视频和音频的输出空间,即将处理后的词元转换回期望的去噪后视频和音频格式。
-
JointDenoisingTransformer:作为主类,集成上述所有组件并定义完整的前向传播逻辑,协调整个去噪过程。
首先定义 InputProjector 类,负责处理带噪声视频和音频输入的补丁化与嵌入,以及时间步和上下文信息的嵌入。
TEXT_EMBED_DIM = 768  # Dimension of text embeddings (meaning the size of the text feature vector)  # 文本嵌入的维度 (即文本特征向量的大小)
VIDEO_PATCH_SIZE_F = 2 # Video patch size in frames (meaning how many frames each video patch contains)  # 视频补丁在帧维度的大小 (即每个视频补丁包含的帧数)
VIDEO_PATCH_SIZE_H = 2 # Video patch size in height (meaning how many pixels each video patch contains in height)  # 视频补丁在高度维度的大小 (即每个视频补丁在高度上包含的像素数)
VIDEO_PATCH_SIZE_W = 2 # Video patch size in width (meaning how many pixels each video patch contains in width)  # 视频补丁在宽度维度的大小 (即每个视频补丁在宽度上包含的像素数)
AUDIO_PATCH_SIZE = 16 # Audio patch size (meaning how many audio samples each audio patch contains)  # 音频补丁大小 (即每个音频补丁包含的音频样本数)
# This class projects noisy video and audio inputs into patches, embeds them, and combines them with timestep and context embeddings.
# 此类将带噪声的视频和音频输入投影为补丁,对其进行嵌入,并与时间步和上下文嵌入相结合。
class InputProjector(nn.Module):
    def __init__(self, is_upsampler, embed_dim):
        super().__init__()
        self.is_upsampler = is_upsampler
        self.embed_dim = embed_dim
        # Timestep embedding: encodes diffusion timestep and projects to embed_dim
        # 时间步嵌入:编码扩散时间步并投影到 embed_dim
        self.t_embedder = nn.Sequential(TimestepEmbedding(embed_dim), nn.Linear(embed_dim * 4, embed_dim))
        # Context embedding: projects text/image embedding to embed_dim
        # 上下文嵌入:将文本/图像嵌入投影到 embed_dim
        self.c_embedder = nn.Linear(TEXT_EMBED_DIM, embed_dim)
        # Video patching: patch size and patcher for video latent tensor
        # 视频分块:视频潜在张量的分块大小和分块器
        self.video_patch_size = VIDEO_PATCH_SIZE_F * VIDEO_PATCH_SIZE_H * VIDEO_PATCH_SIZE_W * VIDEO_LATENT_CHANNELS
        self.video_patcher = nn.Conv3d(
            VIDEO_LATENT_CHANNELS, embed_dim,
            kernel_size=(VIDEO_PATCH_SIZE_F, VIDEO_PATCH_SIZE_H, VIDEO_PATCH_SIZE_W),
            stride=(VIDEO_PATCH_SIZE_F, VIDEO_PATCH_SIZE_H, VIDEO_PATCH_SIZE_W)
        )
        # Audio patching: patch size and patcher for audio latent tensor
        # 音频分块:音频潜在张量的分块大小和分块器
        self.audio_patch_size = AUDIO_PATCH_SIZE * AUDIO_LATENT_CHANNELS
        self.audio_patcher = nn.Conv1d(
            AUDIO_LATENT_CHANNELS, embed_dim,
            kernel_size=AUDIO_PATCH_SIZE, stride=AUDIO_PATCH_SIZE
        )
        # If upsampler, add patcher for low-res video input
        # 如果是上采样器,则为低分辨率视频输入添加分块器
        if self.is_upsampler:
            self.low_res_patcher = nn.Conv3d(
                VIDEO_LATENT_CHANNELS, embed_dim,
                kernel_size=(VIDEO_PATCH_SIZE_F, VIDEO_PATCH_SIZE_H, VIDEO_PATCH_SIZE_W),
                stride=(VIDEO_PATCH_SIZE_F, VIDEO_PATCH_SIZE_H, VIDEO_PATCH_SIZE_W)
            )
    def forward(self, noisy_video, noisy_audio, t, context, low_res_video=None):
        # Patch and embed the noisy video: (B, embed_dim, F', H', W') -> (B, N_patches, embed_dim)
        # 对带噪视频进行分块和嵌入:(批量大小, embed_dim, F', H', W') -> (批量大小, 补丁数量, embed_dim)
        video_patches = rearrange(self.video_patcher(noisy_video), 'b c f h w -> b (f h w) c')
        # Patch and embed the noisy audio: (B, embed_dim, L') -> (B, N_audio_patches, embed_dim)
        # 对带噪音频进行分块和嵌入:(批量大小, embed_dim, L') -> (批量大小, 音频补丁数量, embed_dim)
        audio_patches = rearrange(self.audio_patcher(noisy_audio), 'b c l -> b l c')
        # Embed timestep and context, then sum for conditioning
        # 嵌入时间步和上下文,然后求和作为条件信息
        t_emb = self.t_embedder(t)
        c_emb = self.c_embedder(context)
        cond_emb = t_emb + c_emb
        # If upsampler, patch and embed the low-res video
        # 如果是上采样器,则对低分辨率视频进行分块和嵌入
        low_res_patches = None
        if self.is_upsampler and low_res_video is not None:
            low_res_patches = rearrange(self.low_res_patcher(low_res_video), 'b c f h w -> b (f h w) c')
        # Return all projected patches and conditioning embedding
        # 返回所有投影后的补丁和条件嵌入
        return video_patches, audio_patches, cond_emb, low_res_patches
InputProjector 类实现了以下功能:
-
将带噪声的视频和音频输入投影为补丁。
-
对补丁进行嵌入,并将其与时间步和上下文嵌入相结合。
接下来定义 TokenBuilder 类,负责从投影的补丁创建词元序列。该类将处理视频和音频的特殊模态词元的创建,并在上采样模式下可选地为低分辨率视频创建特殊词元。
class TokenBuilder(nn.Module):
    def __init__(self, is_upsampler, embed_dim):
        super().__init__()
        self.is_upsampler = is_upsampler
        self.embed_dim = embed_dim
        # Learnable token for video modality
        # 视频模态的可学习词元
        self.video_token = nn.Parameter(torch.randn(1, 1, embed_dim))
        # Learnable token for audio modality
        # 音频模态的可学习词元
        self.audio_token = nn.Parameter(torch.randn(1, 1, embed_dim))
        # Learnable token for low-res video (only if upsampler)
        # 低分辨率视频的可学习词元 (仅当是上采样器时)
        if self.is_upsampler:
            self.low_res_token = nn.Parameter(torch.randn(1, 1, embed_dim))
    def forward(self, B, video_patches, audio_patches, low_res_patches=None):
        # Start with video token, video patches, audio token, audio patches
        # 以视频词元、视频补丁、音频词元、音频补丁开始构建序列
        tokens = [
            self.video_token.repeat(B, 1, 1),  # (批量大小, 1, embed_dim)
            video_patches,                     # (批量大小, 视频补丁数量, embed_dim)
            self.audio_token.repeat(B, 1, 1),  # (批量大小, 1, embed_dim)
            audio_patches                      # (批量大小, 音频补丁数量, embed_dim)
        ]
        # If upsampler, prepend low-res token and low-res patches
        # 如果是上采样器,则在序列前端添加低分辨率词元和低分辨率补丁
        if self.is_upsampler and low_res_patches is not None:
            tokens = [
                self.low_res_token.repeat(B, 1, 1),  # (批量大小, 1, embed_dim)
                low_res_patches                      # (批量大小, 低分辨率补丁数量, embed_dim)
            ] + tokens
        # Concatenate all tokens along the sequence dimension
        # 沿序列维度拼接所有词元
        return torch.cat(tokens, dim=1)
TokenBuilder 类实现了以下功能:
-
为视频和音频补丁创建特殊的模态指示词元。
-
在上采样模式下,可选择为低分辨率视频补丁创建特殊的模态指示词元。
现在定义 PatchTransformer 类,它将 Transformer 架构应用于 TokenBuilder 创建的词元序列。该类负责处理位置嵌入以及对词元序列进行 Transformer 模块的堆叠处理。
# --- Latent Space Dimensions ---
# --- 潜在空间维度 ---
VIDEO_LATENT_FRAMES = 8 # Number of frames in the video latent space (meaning how many frames are represented in the video latent)  # 视频潜在空间中的帧数 (即视频潜在表示中包含的帧数)
BASE_VIDEO_LATENT_H = 4 # Base video latent height (meaning the height of the video latent representation before upsampling)  # 基础视频潜在表示的高度 (即上采样前视频潜在表示的高度)
BASE_VIDEO_LATENT_W = 4 # Base video latent width (meaning the width of the video latent representation before upsampling)  # 基础视频潜在表示的宽度 (即上采样前视频潜在表示的宽度)
UPSAMPLED_VIDEO_LATENT_H = 8 # Upsampled video latent height (meaning the height of the video latent representation after upsampling)  # 上采样视频潜在表示的高度 (即上采样后视频潜在表示的高度)
UPSAMPLED_VIDEO_LATENT_W = 8 # Upsampled video latent width (meaning the width of the video latent representation after upsampling)  # 上采样视频潜在表示的宽度 (即上采样后视频潜在表示的宽度)
AUDIO_LATENT_SAMPLES = AUDIO_SAMPLES // 32 # Number of audio samples in the latent space (meaning how many audio samples are represented in the audio latent)  # 音频潜在空间中的样本数 (即音频潜在表示中包含的音频样本数)
# --- Transformer (DiT) Architecture ---
# --- Transformer (DiT) 架构参数 ---
DIT_EMBED_DIM = 256 # Main dimension for the transformer  # Transformer 的主要嵌入维度
DIT_DEPTH = 4       # Number of transformer blocks  # Transformer 模块的层数
DIT_HEADS = 4       # Number of attention heads  # 注意力头的数量
# Patch PatchTransformer for processing video and audio patches
class PatchTransformer(nn.Module):
    def __init__(self, is_upsampler, embed_dim):
        super().__init__()
        self.is_upsampler = is_upsampler
        self.embed_dim = embed_dim
        # Determine video patch dimensions based on upsampler mode
        video_h = UPSAMPLED_VIDEO_LATENT_H if is_upsampler else BASE_VIDEO_LATENT_H
        video_w = UPSAMPLED_VIDEO_LATENT_W if is_upsampler else BASE_VIDEO_LATENT_W
        # Calculate number of video patches
        video_patches = (
            (video_h // VIDEO_PATCH_SIZE_H) *
            (video_w // VIDEO_PATCH_SIZE_W) *
            (VIDEO_LATENT_FRAMES // VIDEO_PATCH_SIZE_F)
        )
        # Calculate number of audio patches
        audio_patches = AUDIO_LATENT_SAMPLES // AUDIO_PATCH_SIZE
        # Total number of tokens (patches + special tokens)
        num_patches = video_patches + audio_patches + 2  # +2 for special tokens
        if is_upsampler:
            # Add low-res video patches and token if upsampler
            low_res_video_patches = (
                (BASE_VIDEO_LATENT_H // VIDEO_PATCH_SIZE_H) *
                (BASE_VIDEO_LATENT_W // VIDEO_PATCH_SIZE_W) *
                (VIDEO_LATENT_FRAMES // VIDEO_PATCH_SIZE_F)
            )
            num_patches += low_res_video_patches + 1  # +1 for low-res token
        # Learnable positional embedding for all tokens
        self.pos_embed = nn.Parameter(torch.randn(1, int(num_patches), embed_dim))
        # Stack of transformer blocks
        self.transformer_blocks = nn.ModuleList([
            TransformerBlock(embed_dim, DIT_HEADS)
            for _ in range(DIT_DEPTH)
        ])
    def forward(self, x, cond_emb):
        # Adjust positional embedding if input has more tokens than expected
        if x.shape[1] > self.pos_embed.shape[1]:
            extra_pos = torch.randn(1, x.shape[1] - self.pos_embed.shape[1], self.embed_dim, device=x.device)
            pos_embed = torch.cat([self.pos_embed, extra_pos], dim=1)
        else:
            pos_embed = self.pos_embed[:, :x.shape[1]]
        # Add positional embedding to input tokens
        x += pos_embed
        # Pass through each transformer block with conditioning
        for block in self.transformer_blocks:
            x = block(x, cond_emb)
        return x
PatchTransformer 类实现了以下功能:
-
将位置嵌入应用于词元序列。
-
通过多个 Transformer 模块处理词元序列,以捕捉序列内部的关系和依赖性。
第四个组件是 OutputProjector 类,它负责将经过 Transformer 处理的词元序列投影回期望的去噪后视频和音频输出。该类将处理最终的层归一化和线性投影操作。
class OutputProjector(nn.Module):
    def __init__(self, is_upsampler, embed_dim, video_patch_size, audio_patch_size):
        super().__init__()
        self.is_upsampler = is_upsampler
        self.embed_dim = embed_dim
        # Final projection layers for video and audio outputs
        # 用于视频和音频输出的最终投影层
        self.final_video = FinalLayer(embed_dim, video_patch_size, VIDEO_LATENT_CHANNELS)
        self.final_audio = FinalLayer(embed_dim, audio_patch_size, AUDIO_LATENT_CHANNELS)
    def forward(self, x, cond_emb, video_patches_shape, audio_patches_shape, noisy_audio_shape, low_res_patches_shape=None):
        # Determine the starting index for video patches in the token sequence
        # 确定词元序列中视频补丁的起始索引
        start_idx = 1
        if self.is_upsampler and low_res_patches_shape is not None:
            # If upsampler, skip low-res token and its patches
            # 如果是上采样器,则跳过低分辨率词元及其补丁
            start_idx += 1 + low_res_patches_shape[1]
        # Extract video patch tokens from the sequence
        # 从序列中提取视频补丁词元
        vid_out_patches = x[:, start_idx : start_idx + video_patches_shape[1]]
        # Project video patch tokens to latent video patches
        # 将视频补丁词元投影为潜在视频补丁
        vid_pred = self.final_video(vid_out_patches, cond_emb)
        # Rearrange the predicted video patches back to (B, C, F, H, W)
        # 将预测的视频补丁重排回 (批量大小, 通道数, 帧数, 高, 宽) 的形状
        vid_pred = rearrange(
            vid_pred,
            'b (f h w) (p1 p2 p3 c) -> b c (f p1) (h p2) (w p3)',
            p1=VIDEO_PATCH_SIZE_F,
            p2=VIDEO_PATCH_SIZE_H,
            p3=VIDEO_PATCH_SIZE_W,
            h=(UPSAMPLED_VIDEO_LATENT_H if self.is_upsampler else BASE_VIDEO_LATENT_H) // VIDEO_PATCH_SIZE_H,
            w=(UPSAMPLED_VIDEO_LATENT_W if self.is_upsampler else BASE_VIDEO_LATENT_W) // VIDEO_PATCH_SIZE_W,
            f=VIDEO_LATENT_FRAMES // VIDEO_PATCH_SIZE_F
        )
        # Extract audio patch tokens from the sequence
        # 从序列中提取音频补丁词元
        aud_out_patches = x[:, start_idx + video_patches_shape[1] + 1 : start_idx + video_patches_shape[1] + 1 + audio_patches_shape[1]]
        # Project audio patch tokens to latent audio patches
        # 将音频补丁词元投影为潜在音频补丁
        aud_pred = self.final_audio(aud_out_patches, cond_emb)
        # Rearrange the predicted audio patches back to (B, C, L)
        # 将预测的音频补丁重排回 (批量大小, 通道数, 长度) 的形状
        aud_pred = rearrange(
            aud_pred,
            'b l (p c) -> b c (l p)',
            p=AUDIO_PATCH_SIZE,
            c=AUDIO_LATENT_CHANNELS
        )
        # If needed, interpolate audio to match the original noisy audio length
        # 如果需要,对音频进行插值以匹配原始带噪音频的长度
        if aud_pred.shape[2] != noisy_audio_shape[2]:
            aud_pred = F.interpolate(aud_pred, size=noisy_audio_shape[2], mode='linear', align_corners=False)
        return vid_pred, aud_pred
OutputProjector 类实现了以下功能:
-
将经过 Transformer 处理的词元序列投影回视频和音频的输出空间。
-
执行最终的层归一化和线性投影,生成去噪后的输出。
最后,将上述所有组件整合到主类 JointDenoisingTransformer 中,该类将输入投影、词元构建、补丁转换和输出投影等步骤串联起来,形成完整的前向传播逻辑。
class JointDenoisingTransformer(nn.Module):
    def __init__(self, is_upsampler=False):
        super().__init__()
        self.is_upsampler = is_upsampler
        self.embed_dim = DIT_EMBED_DIM
        # Projects noisy inputs into patch embeddings and combines with timestep/context
        # 将带噪输入投影为补丁嵌入,并与时间步/上下文信息结合
        self.input_proj = InputProjector(is_upsampler, self.embed_dim)
        # Builds token sequence from patch embeddings (with special tokens)
        # 从补丁嵌入构建词元序列 (包含特殊模态词元)
        self.token_builder = TokenBuilder(is_upsampler, self.embed_dim)
        # Processes tokens with transformer blocks and conditioning
        # 使用 Transformer 模块和条件信息处理词元序列
        self.patch_transformer = PatchTransformer(is_upsampler, self.embed_dim)
        # Projects transformer output tokens back to video/audio latent space
        # 将 Transformer 输出的词元投影回视频/音频潜在空间
        self.output_proj = OutputProjector(
            is_upsampler, self.embed_dim,
            self.input_proj.video_patch_size,
            self.input_proj.audio_patch_size
        )
    def forward(self, noisy_video, noisy_audio, t, context, low_res_video=None):
        B = noisy_video.shape[0]
        # Project noisy video/audio into patch embeddings and get conditioning embedding
        # 将带噪视频/音频投影为补丁嵌入,并获取条件嵌入
        video_patches, audio_patches, cond_emb, low_res_patches = self.input_proj(
            noisy_video, noisy_audio, t, context, low_res_video
        )
        # Build token sequence from patches (and low-res patches if upsampler)
        # 从补丁 (如果是上采样器,则包括低分辨率补丁) 构建词元序列
        x = self.token_builder(B, video_patches, audio_patches, low_res_patches)
        # Process tokens through transformer blocks with conditioning
        # 通过带条件的 Transformer 模块处理词元序列
        x = self.patch_transformer(x, cond_emb)
        # Project tokens back to denoised video/audio predictions
        # 将词元投影回预测的去噪后视频/音频
        vid_pred, aud_pred = self.output_proj(
            x, cond_emb,
            video_patches.shape, audio_patches.shape, noisy_audio.shape,
            low_res_patches.shape if low_res_patches is not None else None
        )
        return vid_pred, aud_pred
JointDenoisingTransformer 类已定义完毕。它是一个用于对视频和音频数据进行去噪的神经网络模型,集成了输入投影、词元构建、补丁转换和输出投影等多个组件。该模型能够处理基础分辨率和上采样分辨率的任务,通过处理带噪声的视频和音频输入来生成去噪后的输出。
VideoVAE、AudioVAE、ConditioningEncoder 和 JointDenoisingTransformer 等核心类均已定义。接下来,将进入模型训练阶段,实例化这些组件,并利用先前准备的数据集来优化模型参数。
Veo 3 模型训练
第三阶段是基于前述架构进行模型训练。在详细介绍训练循环逻辑之前,首先实例化模型的各个组件,并为训练过程做好准备。
DENOISER_TIMESTEPS = 1000  # Number of denoising timesteps (the number of steps in the denoising process)  # 去噪过程的时间步总数
# Instantiate the base denoiser (for base resolution) and move to device
# 实例化基础分辨率去噪器,并将其移至指定计算设备
base_denoiser = JointDenoisingTransformer(is_upsampler=False).to(DEVICE)
# Instantiate the upsampler denoiser (for upsampled resolution) and move to device
# 实例化上采样分辨率去噪器,并将其移至指定计算设备
upsampler_denoiser = JointDenoisingTransformer(is_upsampler=True).to(DEVICE)
# Create a DDPM noise scheduler for the denoising process
# 为去噪过程创建一个 DDPM 噪声调度器
noise_scheduler = DDPMScheduler(num_train_timesteps=DENOISER_TIMESTEPS, beta_schedule="linear")
上述代码实例化了用于基础分辨率视频和音频去噪的 base_denoiser,以及用于上采样分辨率去噪的 upsampler_denoiser。noise_scheduler 负责管理去噪过程中的噪声水平。
# --- Training Hyperparameters ---
# --- 训练超参数 ---
NUM_EPOCHS = 10 # Number of epochs for training (meaning how many times the model will see the entire dataset)  # 训练的总轮数 (即模型完整遍历数据集的次数)
LEARNING_RATE = 1e-4 # Learning rate for the optimizer (meaning how quickly the model learns)  # 优化器的学习率 (即模型学习速率的快慢)
# Create Video and Audio VAEs and move them to the configured device
# 创建视频和音频 VAE,并将其移至配置的计算设备
video_vae = VideoVAE().to(DEVICE)
audio_vae = AudioVAE().to(DEVICE)
# Create the Conditioning Encoder (CLIP-based) and move to device
# 创建条件编码器 (基于CLIP),并将其移至计算设备
conditioning_encoder = ConditioningEncoder().to(DEVICE)
# Gather all parameters from VAEs, denoisers, and conditioning encoder for optimization
# 收集来自 VAE、去噪器和条件编码器的所有参数,以供优化器使用
all_params = (
    list(video_vae.parameters()) +
    list(audio_vae.parameters()) +
    list(base_denoiser.parameters()) +
    list(upsampler_denoiser.parameters()) +
    list(conditioning_encoder.parameters())
)
# Create AdamW optimizer for all model parameters
# 为所有模型参数创建 AdamW 优化器
optimizer = optim.AdamW(all_params, lr=LEARNING_RATE)
# Define mean squared error loss for training
# 定义用于训练的均方误差损失函数
loss_fn = nn.MSELoss()
# Cosine annealing learning rate scheduler for optimizer
# 为优化器配置余弦退火学习率调度器
lr_scheduler = CosineAnnealingLR(
    optimizer,
    T_max=len(train_dataloader) * NUM_EPOCHS
)
实例化 VideoVAE、AudioVAE 和 ConditioningEncoder 模型,并配置了用于训练的优化器和学习率调度器。优化器选用 AdamW,学习率调度策略为 CosineAnnealingLR。损失函数采用均方误差 (MSE) 来训练去噪器。
训练循环的核心目标是训练两个去噪器(基础分辨率去噪器和上采样分辨率去噪器)来准确预测添加到潜在表示中的噪声,并通过最小化均方误差(MSE)损失来实现。在前向传播过程中:
-
首先,对低分辨率的 video_base 潜在表示添加噪声,并训练 base_denoiser 来预测此噪声,同时处理音频部分的去噪。
-
接着,对高分辨率的 video_upsampled 潜在表示添加噪声,并训练 upsampler_denoiser 来预测此噪声。在此阶段,带噪声的低分辨率视频潜在表示将作为额外的条件信号输入,以辅助模型在高分辨率重建中添加更多细节。
在反向传播过程中,计算来自两个去噪模型的组合损失,执行反向传播,并更新所有相关模型的参数。整个训练过程使用单一优化器,训练循环中包含针对基础阶段和上采样阶段的独立损失计算。
接下来定义模型的训练循环。该循环将迭代数据集,处理每个批次的数据,并根据计算得到的损失更新模型参数。根据每个批次的模态信息,模型将对视频和音频数据进行差异化处理,并应用相应的去噪模型(基础模型或上采样模型)。
# --- Training Hyperparameters ---
# --- 训练超参数 ---
GRADIENT_CLIP_NORM = 1.0 # Gradient clipping norm (to prevent exploding gradients)  # 梯度裁剪范数 (用以防止梯度爆炸)
# save loss and learning rate for plotting later
# 保存损失和学习率以便后续绘图
loss_history = []
for epoch in range(NUM_EPOCHS):
    total_loss = 0.0
    for batch_idx, batch in enumerate(train_dataloader):
        optimizer.zero_grad()
        # --- Unpack and move data to device ---
        # --- 解包数据并将数据移至计算设备 ---
        modality = batch['modality']
        video_base, video_upsampled, audio, img_base = (b.to(DEVICE) for b in (batch['video_base'], batch['video_upsampled'], batch['audio'], batch['input_image_base']))
        raw_caption = batch['raw_caption'] # This is a list of strings  # 这是一个字符串列表
        # Sample random timesteps for diffusion process
        # 为扩散过程采样随机时间步
        timesteps = torch.randint(0, noise_scheduler.config.num_train_timesteps, (BATCH_SIZE,), device=DEVICE).long()
        # --- VAE Encoding and Conditioning ---
        # --- VAE 编码与条件化 ---
        with torch.no_grad():
            # Encode video and audio to latent space
            # 将视频和音频编码到潜在空间
            video_latents_base = video_vae.encode(video_base)
            video_latents_upsampled = video_vae.encode(video_upsampled)
            audio_latents = audio_vae.encode(audio)
            # Get text embeddings for captions
            # 获取字幕的文本嵌入
            text_embeds = conditioning_encoder.get_text_embeds(raw_caption)
        context = text_embeds
        # If modality is image-to-video, also get image embeddings and add to context
        # 如果模态是图像到视频,则同时获取图像嵌入并加入到上下文中
        if modality[0] == 'i2v':
            with torch.no_grad():
                img_embeds = conditioning_encoder.get_image_embeds(img_base)
            context += img_embeds
        # --- Base Model Training Stage (Video + Audio) ---
        # --- 基础模型训练阶段 (视频 + 音频) ---
        # Add noise to video and audio latents
        # 向视频和音频的潜在表示添加噪声
        noise_vid_base = torch.randn_like(video_latents_base)
        noisy_video_base = noise_scheduler.add_noise(video_latents_base, noise_vid_base, timesteps)
        noise_aud = torch.randn_like(audio_latents)
        noisy_audio = noise_scheduler.add_noise(audio_latents, noise_aud, timesteps)
        # Predict noise using base denoiser
        # 使用基础去噪器预测噪声
        pred_noise_vid_base, pred_noise_aud = base_denoiser(noisy_video_base, noisy_audio, timesteps, context)
        # Compute loss for video and audio
        # 计算视频和音频的损失
        loss_base_vid = loss_fn(pred_noise_vid_base, noise_vid_base)
        loss_aud = loss_fn(pred_noise_aud, noise_aud)
        # --- Upsampler Model Training Stage (Video Only) ---
        # --- 上采样模型训练阶段 (仅视频) ---
        # Add noise to upsampled video latents
        # 向上采样视频的潜在表示添加噪声
        noise_vid_up = torch.randn_like(video_latents_upsampled)
        noisy_video_upsampled = noise_scheduler.add_noise(video_latents_upsampled, noise_vid_up, timesteps)
        # Predict noise using upsampler denoiser, conditioned on noisy low-res video
        # 使用上采样去噪器预测噪声,以带噪声的低分辨率视频为条件
        pred_noise_vid_up, _ = upsampler_denoiser(noisy_video_upsampled, torch.zeros_like(noisy_audio), timesteps, context, low_res_video=noisy_video_base)
        # Compute loss for upsampled video
        # 计算上采样视频的损失
        loss_upsample_vid = loss_fn(pred_noise_vid_up, noise_vid_up)
        # --- Combined Loss and Backward Pass ---
        # --- 组合损失与反向传播 ---
        # Combine all losses
        # 组合所有损失
        loss = loss_base_vid + loss_aud + loss_upsample_vid
        # Backpropagate
        # 执行反向传播
        loss.backward()
        # Clip gradients to prevent exploding gradients
        # 裁剪梯度以防止梯度爆炸
        torch.nn.utils.clip_grad_norm_(all_params, GRADIENT_CLIP_NORM)
        # Update model parameters
        # 更新模型参数
        optimizer.step()
        # Update learning rate
        # 更新学习率
        lr_scheduler.step()
        total_loss += loss.item()
        # In case you want to print the loss for each batch
        # 如果需要,可以打印每个批次的损失值
        # print(f"Batch {batch_idx+1}/{len(train_dataloader)}, Loss: {loss.item():.4f}")
    # Average loss for the epoch
    # 当前周期的平均损失
    loss_history.append(total_loss / len(train_dataloader))
    print(f"Epoch {epoch+1} Avg Loss: {total_loss / len(train_dataloader):.4f}")
print("--- Training Finished ---")
Epoch 2 Avg Loss: 3.7529
Epoch 3 Avg Loss: 3.6651
Epoch 4 Avg Loss: 3.5488
Epoch 5 Avg Loss: 3.5301
Epoch 6 Avg Loss: 3.5549
Epoch 7 Avg Loss: 3.4246
Epoch 8 Avg Loss: 3.4193
Epoch 9 Avg Loss: 3.4146
Epoch 10 Avg Loss: 3.3345
--- Training Finished ---
训练循环执行完毕后,可以观察到每个周期的组合损失。为了更直观地评估模型训练过程,我们将训练损失随周期的变化进行可视化。
plt.figure(figsize=(16, 3))
plt.plot(loss_history, label='Training Loss', marker='o')
plt.xlabel('Epoch')
plt.ylabel('Loss')
plt.title('Training Loss Over Epochs')
plt.legend()
plt.grid(True)
plt.show()
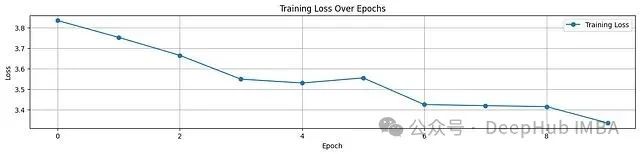
从图中可见,损失值呈下降趋势,但下降幅度未达理想状态。这表明模型需要更多轮次的训练,并可能需要进一步调整超参数。由于计算资源限制,本演示在此暂停训练,重点在于展示代码结构与执行流程。
模型训练完成后(尽管本例中训练不充分),即可利用其从文本提示或图像生成视频。这是接下来的步骤。
基于级联逆向扩散的 Veo 3 推理
模型已完成数个周期的训练。尽管我们已实现了模型的各个组件,但当前模型的复杂度和训练程度尚不足以支撑一次完整的、高质量的训练运行。
尽管如此,我们仍可利用已训练(或部分训练)的模型执行推理过程。需要注意的是,由于模型未在足量的大规模数据上进行充分训练,预期输出的视频和音频将包含显著噪声。
推理过程并非简单的前向传播,它涉及额外的输入准备和输出处理步骤。
模型的推理过程采用级联逆向扩散(cascaded reverse diffusion)策略,分为两个主要步骤:
-
首先,生成低分辨率的基础潜在表示(视频和音频)。
-
然后,利用这些生成的基础潜在表示作为条件,输入到上采样器模型中,将视频细化至更高分辨率。
此逻辑对于文本到视频(T2V)和图像到视频(I2V)的推理均适用。若提供图像作为输入,其嵌入将被添加到基础模型和上采样器模型的上下文中。
最终,经过处理的“纯净”高分辨率视频潜在表示和基础音频潜在表示将分别通过其对应的 VAE 解码器,生成最终的视频和音频输出。
以下 generate_content 函数实现了上述两阶段逆向扩散的推理逻辑。
INFERENCE_STEPS = 50 # Number of steps for inference denoising (the number of steps in the inference process)  # 推理去噪的步数 (即推理过程中的迭代次数)
def generate_content(prompt, input_image_path=None, steps=INFERENCE_STEPS):
    # Set all models to evaluation mode
    # 将所有模型设置为评估模式
    for m in [video_vae, audio_vae, base_denoiser, upsampler_denoiser, conditioning_encoder]:
        m.eval()
    with torch.no_grad():
        # --- 1. Prepare Conditioning ---
        # --- 1. 准备条件信息 ---
        # Get text embeddings for the prompt
        # 获取提示文本的嵌入
        text_embeds = conditioning_encoder.get_text_embeds(prompt)
        context = text_embeds
        # If an input image is provided, get its embedding and add to context
        # 如果提供了输入图像,则获取其嵌入并添加到上下文中
        if input_image_path:
            img_pil = Image.open(input_image_path).convert("RGB").resize((BASE_VIDEO_WIDTH, BASE_VIDEO_HEIGHT))
            img_tensor = transforms.ToTensor()(img_pil).unsqueeze(0).to(DEVICE)
            context += conditioning_encoder.get_image_embeds(img_tensor)
        # --- 2. Base Generation Stage ---
        # --- 2. 基础分辨率生成阶段 ---
        # Sample random noise for base video and audio latents
        # 为基础视频和音频的潜在表示采样随机噪声
        vid_latents_base = torch.randn(1, VIDEO_LATENT_CHANNELS, VIDEO_LATENT_FRAMES, BASE_VIDEO_LATENT_H, BASE_VIDEO_LATENT_W, device=DEVICE)
        aud_latents = torch.randn(1, AUDIO_LATENT_CHANNELS, AUDIO_LATENT_SAMPLES, device=DEVICE)
        # Set the scheduler timesteps for inference
        # 为推理过程设置调度器的时间步
        noise_scheduler.set_timesteps(steps)
        # Denoising loop for base video and audio
        # 基础视频和音频的去噪循环
        for t in tqdm(noise_scheduler.timesteps, desc="Denoising (Base)"):
            ts = t.unsqueeze(0).to(DEVICE)
            pred_vid_noise, pred_aud_noise = base_denoiser(vid_latents_base, aud_latents, ts, context)
            vid_latents_base = noise_scheduler.step(pred_vid_noise, t, vid_latents_base).prev_sample
            aud_latents = noise_scheduler.step(pred_aud_noise, t, aud_latents).prev_sample
        # --- 3. Upsampler Generation Stage ---
        # --- 3. 上采样分辨率生成阶段 ---
        # Sample random noise for upsampled video latents
        # 为上采样视频的潜在表示采样随机噪声
        vid_latents_upsampled = torch.randn(1, VIDEO_LATENT_CHANNELS, VIDEO_LATENT_FRAMES, UPSAMPLED_VIDEO_LATENT_H, UPSAMPLED_VIDEO_LATENT_W, device=DEVICE)
        # Denoising loop for upsampled video, conditioned on clean base video latents
        # 上采样视频的去噪循环,以纯净的基础视频潜在表示为条件
        for t in tqdm(noise_scheduler.timesteps, desc="Denoising (Upsampler)"):
            ts = t.unsqueeze(0).to(DEVICE)
            pred_vid_noise_up, _ = upsampler_denoiser(
                vid_latents_upsampled, torch.zeros_like(aud_latents), ts, context, low_res_video=vid_latents_base
            )
            vid_latents_upsampled = noise_scheduler.step(pred_vid_noise_up, t, vid_latents_upsampled).prev_sample
        # --- 4. Decode Final Latents ---
        # --- 4. 解码最终的潜在表示 ---
        # Decode the final video and audio latents to output
        # 将最终的视频和音频潜在表示解码为输出
        final_video = video_vae.decode(vid_latents_upsampled)
        final_audio = audio_vae.decode(aud_latents)
        return final_video, final_audio
generate_content 函数接收文本提示和可选的输入图像路径,基于提供的提示生成视频和音频内容。它利用训练好的模型,逐步对潜在表示进行去噪,首先处理基础分辨率,然后处理上采样分辨率。
现在,可以利用图像或文本提示进行视频生成。以下为文本到视频生成的测试示例。
# Example: Generate a video and audio from a text prompt using the trained model
# 示例: 使用训练好的模型从文本提示生成视频和音频
t2v_prompt = "A mystical forest with glowing trees and soft ethereal music."
gen_video_t2v, gen_audio_t2v = generate_content(t2v_prompt)
为方便观察生成的视频和音频,定义一个简单的可视化函数。
def display_media(video, audio, title_prefix=""):
    fig, axes = plt.subplots(1, 2, figsize=(15, 3))
    if video is not None:
        # Extract the middle frame from the upsampled video and display it
        # 从上采样视频中提取中间帧并显示
        frame = (video[0,:, BASE_VIDEO_FRAMES//2].permute(1,2,0).cpu().numpy()*255).astype(np.uint8)
        axes[0].imshow(frame)
        axes[0].set_title(f"{title_prefix} Video Frame (Upsampled)")
        axes[0].axis('off')
    if audio is not None:
        # Plot the audio waveform
        # 绘制音频波形
        axes[1].plot(audio[0,0].cpu())
        axes[1].set_title(f"{title_prefix} Audio")
        axes[1].set_xlabel('Sample')
        axes[1].set_ylabel('Amplitude')
    plt.tight_layout()
    plt.show()
print("--- Displaying Generated Outputs ---")
display_media(gen_video_t2v, gen_audio_t2v, "T2V Output")
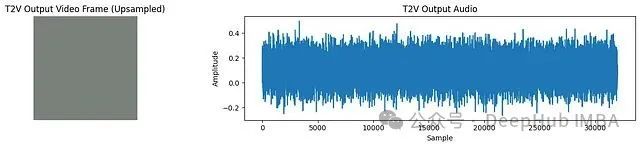
从输出结果可以看出,生成的视频帧包含显著噪声,音频也表现为噪声。这符合预期,因为模型仅在小规模数据集上进行了有限周期的训练。尽管如此,该实验验证了模型能够根据文本提示生成视频和音频,这已达到本项目的主要演示目标。
一个重要的问题随之而来:这个初步的 Veo 3 模型已构建完成,那么 Google 是如何评估其模型性能的呢?这是项目接下来的探讨内容。
评估策略
Google 并未公开 Veo 3 评估所用的全部确切指标,但在其模型介绍中提及 Veo v3 是在 Meta 发布的 MovieGenBench(包含视频和视频+音频两种任务)基准数据集上进行评估的。这些数据集分别包含 1,003 个视频生成提示和 527 个视频+音频生成提示,并附带了由其他主流模型生成的对应视频,例如 Meta 的 MovieGen(视频及视频+音频)、Kling 2.0(仅视频)、Minimax(仅视频)以及 Sora Turbo(仅视频)。
除了使用特定的基准数据集进行评估外,从统计学角度衡量生成视频质量的方法也多种多样。其中,两个常用的客观评价指标是:
-
CLIP Score (CLIP 分数): 此指标利用 CLIP 模型来评估生成的视频内容与输入文本提示之间的语义一致性。它通过计算文本嵌入与视频帧嵌入之间的余弦相似度来实现。
-
LPIPS (Learned Perceptual Image Patch Similarity, 学习感知图像块相似度): 此指标衡量生成的视频帧与参考图像之间的感知相似度,常用于评估生成图像或视频的视觉质量。
这些指标是评估文本到视频生成模型(尤其是此类任务)质量的常用手段。
以下函数用于计算 CLIP 分数:
def calculate_clip_score(gen_video, prompt):
    # Extract the middle frame from the generated video and convert to PIL image
    # 从生成的视频中提取中间帧并转换为 PIL 图像
    middle_frame = gen_video[0, :, BASE_VIDEO_FRAMES // 2].cpu()
    frame_pil = transforms.ToPILImage()(middle_frame)
    # Get CLIP embeddings for the prompt and the frame
    # 获取提示文本和帧的 CLIP 嵌入
    text_embed = conditioning_encoder.get_text_embeds(prompt)
    image_embed = conditioning_encoder.get_image_embeds(frame_pil)
    # Normalize embeddings
    # 对嵌入进行归一化
    text_embed = text_embed / text_embed.norm(dim=-1, keepdim=True)
    image_embed = image_embed / image_embed.norm(dim=-1, keepdim=True)
    # Compute cosine similarity (CLIP score)
    # 计算余弦相似度 (CLIP 分数)
    clip_score = (text_embed @ image_embed.T).item()
    return clip_score
calculate_clip_score 函数接收生成的视频和文本提示,从视频中提取中间帧,计算该帧与提示文本的 CLIP 嵌入,并返回它们之间的余弦相似度作为 CLIP 分数。
类似地,LPIPS 指标用于评估生成视频帧与参考图像之间的感知相似性。通常选用基于 VGG 网络的 LPIPS 模型(net='vgg'),因其在捕捉感知差异方面表现优异。
lpips_model = lpips.LPIPS(net='vgg').to(DEVICE)
def calculate_lpips(gen_video, img_path):
    # Load and preprocess the reference image: resize, convert to tensor, scale to [-1, 1]
    # 加载并预处理参考图像:调整大小、转换为张量、缩放到 [-1, 1] 范围
    input_img = transforms.ToTensor()(
        Image.open(img_path).convert('RGB').resize(
            (UPSAMPLED_VIDEO_WIDTH, UPSAMPLED_VIDEO_HEIGHT)
        )
    ).unsqueeze(0) * 2 - 1
    # Extract and preprocess the first frame from the generated video, scale to [-1, 1]
    # 从生成的视频中提取第一帧并进行预处理,缩放到 [-1, 1] 范围
    gen_frame = gen_video[0, :, 0].cpu().unsqueeze(0) * 2 - 1
    # Compute LPIPS score between the reference image and generated frame
    # 计算参考图像与生成帧之间的 LPIPS 分数
    return lpips_model(input_img.to(DEVICE), gen_frame.to(DEVICE)).item()
对前述生成的文本到视频结果计算 CLIP 分数:
# Calculate the CLIP score for the generated video and prompt.
# 计算生成视频与提示之间的 CLIP 分数。
# This measures how well the generated video matches the text prompt using CLIP embeddings.
# 此分数通过 CLIP 嵌入衡量生成视频与文本提示的匹配程度。
clip_score = calculate_clip_score(gen_video_t2v, t2v_prompt)
print(f"T2V CLIP Score: {clip_score:.4f}")
#### OUTPUT ####
T2V CLIP Score: 0.1389
计算得到的 CLIP 分数接近 0,表明生成质量不佳,这与训练不充分的预期相符。尽管如此,此示例演示了如何对 Veo 3 或类似视频扩散模型等文本到视频生成系统进行定性评估。类似地,也可以计算图像到视频任务的 LPIPS 分数或其他相关指标。
总结
本文详细介绍了一个简化版 Veo 3 文本到视频生成模型的构建过程。首先进行了数据预处理,涵盖了去重、不安全内容过滤、质量合规性检查以及数据标注等环节。
随后设计并实现了模型的整体架构,包括 VideoVAE、AudioVAE、ConditioningEncoder 和 JointDenoisingTransformer 等核心组件。最后,构建了训练循环,并执行了推理过程,以根据提示或图像生成视频。
本项目为理解文本到视频生成模型的工作原理以及如何使用 PyTorch 从零开始构建此类模型提供了一个基础框架。尽管本实现与 Google Veo 3 的复杂度和性能尚有差距,但它清晰地展示了此类先进模型所涉及的核心概念、关键组件及技术流程,为进一步探索和研究奠定了基础。
